Hi @Hakime.mfk
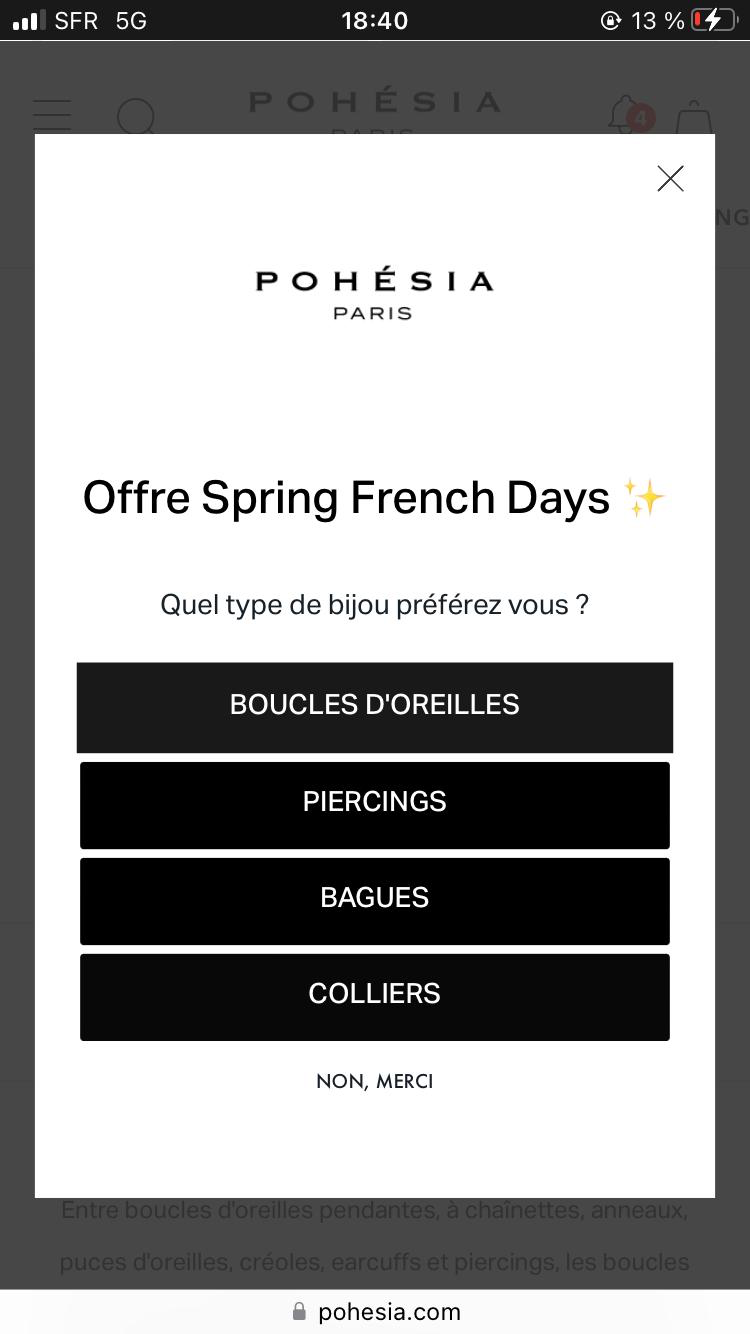
Yes, this issue happens because Klaviyo’s default form setup is limited. It does not allow much flexibility, especially when it comes to how the selection works or how the form looks. for an example, if someone clicks a button to choose an option, the form submits right away - even if they wanted to select more than one thing.
To solve this, we can create a custom version of the form. Instead of the usual checkboxes, we will use buttons that look better and are easier to style and also match with your brand so the form feels like a natural part of your website.
Now, because Klaviyo doesn’t treat buttons like checkboxes, we need to add a small code. This makes the buttons work like checkboxes - people can click to select or unselect multiple options without the form submitting too soon. All of the selected options are saved quietly in a hidden field, so when the user finally submits the form, both their email and the benefits they chose are sent together. This makes sure you collect the right data.
To set this up, we will paste your custom code into a custom HTML block inside the Klaviyo pop-up. That’s what makes the form work the way you want. And we can style the form however you like - custom colors, hover effects, fonts etc so it fits your brand perfectly.
Once it’s done, we can test the form and then use the same. Use div or button type="button" elements to avoid triggering form submission
Track selections using JavaScript.
Store selected options in hidden input fields, so they can be submitted all together later.
Use CSS to style .selected states like real buttons.
Sample HTML
<style>
.option-button {
display: block;
padding: 12px;
margin: 8px 0;
background-color: #000;
color: #fff;
text-align: center;
cursor: pointer;
border: 2px solid transparent;
transition: all 0.2s ease;
}
.option-button.selected {
border-color: #FFD700; /* Highlight when selected */
background-color: #333;
}
</style>
<form id="popupForm">
<div class="option-button" data-value="Earrings">BOUCLES D'OREILLES</div>
<div class="option-button" data-value="Piercings">PIERCINGS</div>
<div class="option-button" data-value="Rings">BAGUES</div>
<div class="option-button" data-value="Necklaces">COLLIERS</div>
<!-- Hidden input to hold the final selections -->
<input type="hidden" name="preferences" id="preferencesInput" />
<input type="email" name="email" placeholder="Your email" required>
<button type="submit">Submit</button>
</form>
<script>
const buttons = document.querySelectorAll('.option-button');
const preferencesInput = document.getElementById('preferencesInput');
const selectedOptions = new Set();
buttons.forEach(btn => {
btn.addEventListener('click', () => {
const value = btn.dataset.value;
btn.classList.toggle('selected');
selectedOptions.has(value) ? selectedOptions.delete(value) : selectedOptions.add(value);
preferencesInput.value = Array.from(selectedOptions).join(', ');
});
});
document.getElementById('popupForm').addEventListener('submit', function (e) {
if (selectedOptions.size === 0) {
e.preventDefault();
alert('Please select at least one option.');
}
});
</script>