Where can I find the purchase date tag (for each purchase)? I tried to find it but I couldn’t. I could only find the first purchase date, but that doesn’t work for an order confirmation email because the first purchase is not the same as the second/third or 100th purchase. Does anyone have an answer?
Thank you for sharing this question and thank you @Bobi N. for your reply.
@BalandiTeam
If you trying to do this in a flow started by metric placed order you can use this code {{ event.extra.processed_at }} and it will show when the order was processed exact time date and time.
But if you are trying to use this in a campaign it won’t work and I don’t think there is dynamic code for campaigns to show last order date for each customer differently.
You are correct that this tag would not work in a campaign email because we rely on the data associated with the triggering event of the flow to dynamically populate information about that event, such as the processing date.
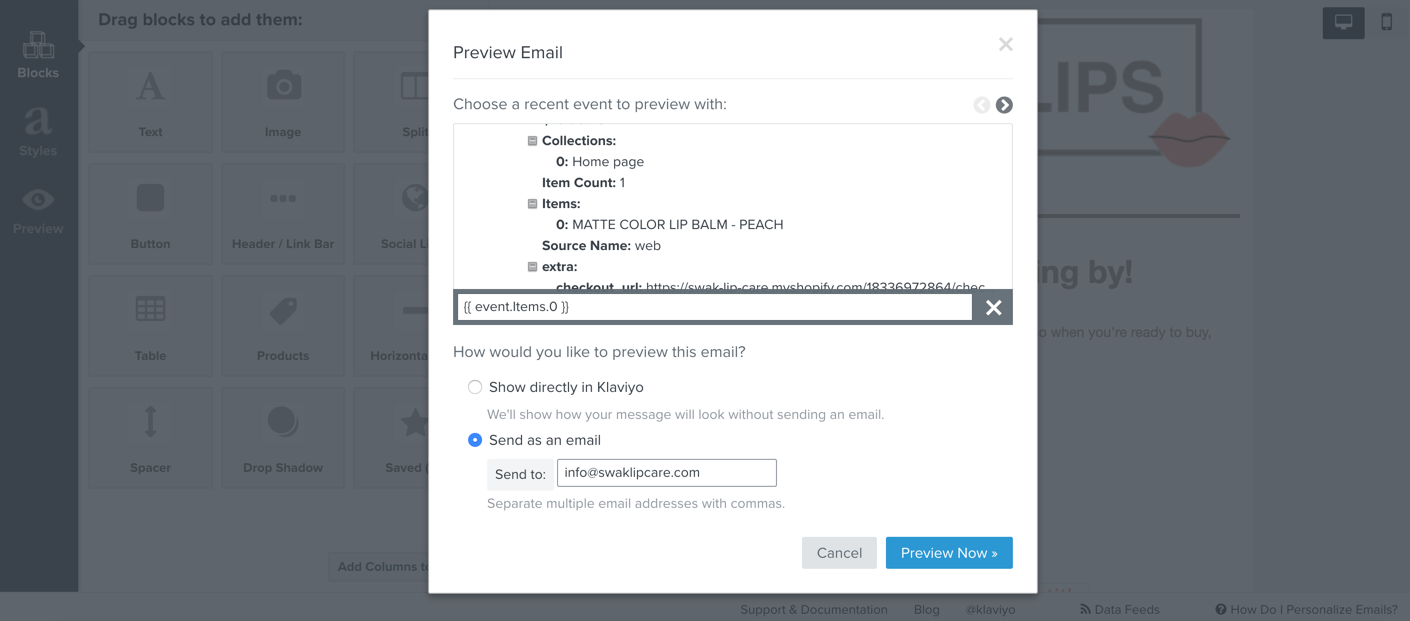
In general, you can view all tags associated with any given event, for example Placed Order, by previewing a flow email in a flow triggered off of that event.
Once in the email template editor, click Preview on the left-hand side. You’ll see a popup saying, Choose a recent event to preview with. In the window, you will see a recent event that corresponds with the flow's trigger. If you want to look at the data for a different individual’s event, toggle left and right using the arrow buttons.
This preview window will show all of the data available for that particular event metric that can be populated in the flow email.
From here, click on any given item in the preview i.e. Item Count and use the tag associated with this variable in your email. For more detail on this topic, we have a great help center article here.
The date you’re highlighting in your screenshot is in fact the event process date and not a date passed as part of the order data. You can think of this event processed date similar to a receipt of when the event was synced to Klaviyo.
Although I don’t have an answer to your question as to “why” we don’t offer access to this event process date, I do agree with you that being able to access that specific data point in an email would certainly be handy for a number of reasons. I’ve gone ahead and shared this feeback with our Product Team along with some of my own thoughts on this matter as well!
Looking at the events within the event properties of an order, you should find some options of a date with the format looking like the following: 2023-04-17T20:11:56+09:30
If you copy the tag for it. Here is one example: {{ event.extra.customer.created_at|default:'' }}
You should be able to make some modification to allow it to be better presented to the customers.
For mine, I removed the word “default” and replaced it to produce the tag: {{ event.extra.created_at|format_date_string|date:'F d, o' }}
Where |form_date_string| represents the fact that we are producing a new date format, and the ‘F d, o’ represents the structure of the date. You can read through the article to see the other options, but basically there are many different formats in which you can present the data, moving around the values to suit you best.
This is a method that has worked completely fine for me, and I believe is probably your best solution for the issue.
The answer below doesn’t address the problem of not having access to the order date (as is the case in the WooCommerce integration that I have). It is just dealing with formatting the date, if you are lucky enough to have one available to you — as appears to be the case for Noah.
So, please Klaviyo make this available to your user, it’s a valuable piece of data!
Wolfgang
If those who are still wondering!
I had the same problem with this, and I believe I have found a solution.
Looking at the events within the event properties of an order, you should find some options of a date with the format looking like the following: 2023-04-17T20:11:56+09:30
If you copy the tag for it. Here is one example: {{ event.extra.customer.created_at|default:'' }}
You should be able to make some modification to allow it to be better presented to the customers.
For mine, I removed the word “default” and replaced it to produce the tag: {{ event.extra.created_at|format_date_string|date:'F d, o' }}
Where |form_date_string| represents the fact that we are producing a new date format, and the ‘F d, o’ represents the structure of the date. You can read through the article to see the other options, but basically there are many different formats in which you can present the data, moving around the values to suit you best.
This is a method that has worked completely fine for me, and I believe is probably your best solution for the issue.